Preface
Recently my friends and I were playing through the Minecraft modpack ATM 9: To the Sky and we got to the point where we had built a Bigger Reactors reactor for RF generation. To control this reactor I ended up creating two Lua scripts that run on CC: Tweaked advanced computers. This first script manages the reactor by automatically turning it on/off based on how much RF it has stored. It also relays information about the reactor back to the second computer. The second script displays the relayed information, and allows for the manual override of the controller to set the reactor to be on or off.
In this post, I’ll detail how each script works, and how to set it up. This tutorial assumes that you already have the passively cooled reactor built.
System Overview
This system uses two advenced computers that wireless communicate via modems.
First Computer
The first computer, which will be referred to as the Manager moving forward, manages turning the reactor on or off as well as relaying information about the reactor to the second computer.
Second Computer
The second computer, which will be referred to as the Controller moving foward, handles displaying the information relayed from Manager to an advanced monitor. As well as allowing the user to select if the reactor should be automatically managed, or manually set to on or off, by clicking buttons on a attached monitor. Then relaying this request to the Manager.
Sequence Diagram
This system can be visualized via the following diagram.
sequenceDiagram
    actor U as User
    participant M as Controller
    participant R as Manager
    participant Re as Reactor

    loop Info Relay
        R->>Re: Get Reactor Stats
        Re-->>R: Return Stats
        R->>M: Transmit Stats
        M->>M: Updates Monitor
    end

    loop Auto Reactor Management
        R->>R: Check RF Threshold
        alt RF below threshold & not active
            R->>Re: Activate Reactor
        else RF above threshold & active
            R->>Re: Deactivate Reactor
        end
    end

    loop User Interaction
        U->>M: Touch Button
        M->>R: Send Command
        alt Override Command
            R->>Re: Set Override & Rector State
        else Auto Command
            R->>Re: Disable Override
        end
    end
Setup
Items Needed
Assuming that you already have the base reactor built, you will need the following items:
| Icon | Item | Quantity |
|---|---|---|
| Advanced Computer | 2 | |
| Advanced Monitor | 4 | |
| Ender Modem | 2 | |
| Computer Port | 1 |
Building
To build this setup, place the items as follows.
For the Manager
- Install the Computer Port in your Reactor
- Place an Advanced Computer so that the back is touching the Computer Port
- Place an Ender Modem on the top of the Advanced Computer
For the Controller
- Choose a spot where you’d like the monitor to be and place the Advanced Monitors in a 2x2 formation
- On the backside of the monitor, place an Advanced Computer so that the back of the computer is touching the back of the monitor
- Place an Ender Modem on the top of the Advanced Computer
Programming the Reactor Manager
Config and Peripherals Connection
First we will create some global variables that we will use throughout the program for configuration. I put these variables in capitals as their value wont change during program execution.
| Variable | Description |
|---|---|
LOW_THRESHOLD_PERCENT |
Defines what RF capacity percent should trigger turning the reactor on |
HIGH_THRESHOLD_PERCENT |
Defines what RF capacity percent should trigger turning the reactor off |
LISTEN_CHANNEL |
Defines what channel on the modem to listen on for messages |
RELAY_CHANNEL |
Defines what channel on the modem to send messages out on |
ACTION_RATE |
specify how often to check the reactor / perform an action, a value of 1 represents once every second, 0.5 would be every half-second |
Then we have one more variable, system_override. We will implement the logic so that when this is false the computer will automatically manage the reactor, and when it’s true the reactor will wither be on or off based on the users selection.
After this, we connect to our attached peripherals. This code assumes that the reactor computer port is on the back of the computer, and the modem is on the top.
 0-- Config variables
 1local LOW_THRESHOLD_PERCENT = 0.3
 2local HIGH_THRESHOLD_PERCENT = 0.85
 3local LISTEN_CHANNEL = 1
 4local RELAY_CHANNEL = 2
 5local ACTION_RATE = 1
 6
 7-- When false, auto-manage the reactor otherwise run in manual mode (on/off)
 8local system_override = false
 9
10-- Connect to the reactor on the back, and modem on the top
11local reactor = peripheral.wrap('back') or error('Reactor not found on the back of computer')
12local modem = peripheral.wrap('top') or error('Modem not found on the top of computer')
Getting the Reactors Statistics
Next we will create a simple function to bundle information about the reactor and return it as a table. This lets us quickly get a bunch of statistics from the reactor and reference it in an easier format. We will also include if system_override is enabled or not.
I determined which functions to call on the reactor from the Bigger Reactors Computer Port Docs.
 0-- Bundles information about the reactor into a table and returns it
 1function getReactorStats()
 2    local stats = {
 3        dynamic = not system_override,
 4        active = reactor.active(),
 5        temperature = reactor.fuelTemperature(),
 6        rf_output = reactor.battery().producedLastTick(),
 7        rf_stored = reactor.battery().stored(),
 8        rf_capacity = reactor.battery().capacity(),
 9        fuel_rate = reactor.fuelTank().burnedLastTick(),
10        fuel_ammount = reactor.fuelTank().fuel(),
11        fuel_capacity = reactor.fuelTank().capacity()
12    }
13    return stats
14end
Automatically Turning the Reactor On or Off
Now we can create a function for automatically managing the reactor. This function will turn the reactor off if it’s stored RF is above the HIGH_THRESHOLD_PERCENT, or turn it off if its below the LOW_THRESHOLD_PERCENT. If system_override is set to true, this process will be ignored. It will be checked once per ACTION_RATE. The idea here is to not run the reactor when we don’t need to, saving resources.
Here’s a diagram to help visualize this process.
graph LR
A[If system_override is false] --> B[Check RF Capacity]
B -- If above threshold --> C((Turn Reactor Off))
B -- If below threshold --> D((Turn Reactor On))
Now for the code.
 0-- Handles the control of the reactor, turning it on if its below the rf stored threshold, off otherwise
 1function manageReactor()
 2    while true do
 3        if system_override then
 4            os.sleep(ACTION_RATE)
 5        else
 6            local s = getReactorStats()
 7            if s.rf_stored < s.rf_capacity * LOW_THRESHOLD_PERCENT and not s.active then
 8                print('RF below threshold, enabling reactor')
 9                reactor.setActive(true)
10            elseif s.rf_stored > s.rf_capacity * HIGH_THRESHOLD_PERCENT and s.active then
11                print('RF threshold met, disabling reaction')
12                reactor.setActive(false)
13            end
14        end
15        os.sleep(ACTION_RATE)
16    end
17end
Sending the Reactors Statistics to the Controller
So we’re able to get information about the reactor and use it in our script. Now let’s also send the reactor information via the modem to the Controller computer. That way we can later display it on a monitor setup.
This function gets the reactor’s information and sends it on the RELAY_CHANNEL once per ACTION_RATE
0-- Gets the reactors information and relays it using a modem
1function relayStats()
2    while true do
3        local stats = getReactorStats()
4        modem.transmit(RELAY_CHANNEL, LISTEN_CHANNEL, stats)
5        os.sleep(ACTION_RATE)
6    end
7end
Receiving Messages from the Controller
The last thing that we need to set up is handling messages sent to the Manager from the Controller. These message will tell the Manager to either run in the reactor in Auto mode, always keep the reactor on, or always keep the reactor off.
First we will create a helper function that we can use to update the system_override variable, and set the reactor’s state.
0-- Updates the system_override variable and sets the reactor state
1function setSystemOverride(override, state)
2    system_override = override
3    reactor.setActive(state)
4    print(string.format("System override: %s, Reactor active: %s", tostring(override), tostring(state)))
5end
Next the function that handles receiving messages on the modem. This function waits until a message is received on the LISTEN_CHANNEL, and verifies that it’s the expected format. Once verified, it calls setSystemOverride() with the passed values.
The expected format is:
0message = {
1    override = true/false, -- true to manually set the reactor, false for auto-manage
2    state = true/false -- true to enable the reactor, false to disable it
3}
And our handler function:
 0-- Handles processing incoming messages from the modem
 1function handleMessage()
 2    while true do
 3        local _, _, recvChannel, _, message = os.pullEvent("modem_message")
 4        if recvChannel == LISTEN_CHANNEL
 5            and type(message) == 'table'
 6            and message.override ~= nil
 7            and message.state ~= nil
 8        then
 9            setSystemOverride(message.override, message.state)
10        end
11    end
12end
For more information on message handling checkout the CC: Tweaked Modem Docs.
Putting it all together
And that’s it! We have all the code we need for the Manager. We can put it all together into one file and add a quick initalizer. The initalizer will open the modem on our LISTEN_CHANNEL and start all our functions with while loops in them in parallel using the CC: Tweaker Parallel Global.
Initalizing:
0-- Initalizer
1function init()
2    modem.open(LISTEN_CHANNEL)
3    parallel.waitForAll(handleMessage, relayStats, manageReactor)
4end
All put together:
 0-- Config variables
 1local LOW_THRESHOLD_PERCENT = 0.3
 2local HIGH_THRESHOLD_PERCENT = 0.85
 3local LISTEN_CHANNEL = 1
 4local RELAY_CHANNEL = 2
 5local ACTION_RATE = 1
 6
 7-- When false, auto-manage the reactor otherwise run in manual mode (on/off)
 8local system_override = false
 9
10-- Connect to the reactor on the back, and modem on the top
11local reactor = peripheral.wrap('back') or error('Reactor not found on the back of computer')
12local modem = peripheral.wrap('top') or error('Modem not found on the top of computer')
13
14-- Bundles information about the reactor into a table and returns it
15function getReactorStats()
16    local stats = {
17        dynamic = not system_override,
18        active = reactor.active(),
19        temperature = reactor.fuelTemperature(),
20        rf_output = reactor.battery().producedLastTick(),
21        rf_stored = reactor.battery().stored(),
22        rf_capacity = reactor.battery().capacity(),
23        fuel_rate = reactor.fuelTank().burnedLastTick(),
24        fuel_ammount = reactor.fuelTank().fuel(),
25        fuel_capacity = reactor.fuelTank().capacity()
26    }
27    return stats
28end
29
30-- Handles the control of the reactor, turning it on if its below the rf stored threshold, off otherwise
31function manageReactor()
32    while true do
33        if system_override then
34            os.sleep(ACTION_RATE)
35        else
36            local s = getReactorStats()
37            if s.rf_stored < s.rf_capacity * LOW_THRESHOLD_PERCENT and not s.active then
38                print('RF below threshold, enabling reactor')
39                reactor.setActive(true)
40            elseif s.rf_stored > s.rf_capacity * HIGH_THRESHOLD_PERCENT and s.active then
41                print('RF threshold met, disabling reaction')
42                reactor.setActive(false)
43            end
44        end
45        os.sleep(ACTION_RATE)
46    end
47end
48
49-- Gets the reactors information and relays it using a modem
50function relayStats()
51    while true do
52        local stats = getReactorStats()
53        modem.transmit(RELAY_CHANNEL, LISTEN_CHANNEL, stats)
54        os.sleep(ACTION_RATE)
55    end
56end
57
58-- Updates the system_override variable and sets the reactor state
59function setSystemOverride(override, state)
60    system_override = override
61    reactor.setActive(state)
62    print(string.format("System override: %s, Reactor active: %s", tostring(override), tostring(state)))
63end
64
65-- Handles processing incoming messages from the modem
66function handleMessage()
67    while true do
68        local _, _, recvChannel, _, message = os.pullEvent("modem_message")
69        if recvChannel == LISTEN_CHANNEL
70            and type(message) == 'table'
71            and message.override ~= nil
72            and message.state ~= nil
73        then
74            setSystemOverride(message.override, message.state)
75        end
76    end
77end
78
79-- Initalizer
80function init()
81    modem.open(LISTEN_CHANNEL)
82    parallel.waitForAll(handleMessage, relayStats, manageReactor)
83end
84
85init()
Programming the Reactor Controller
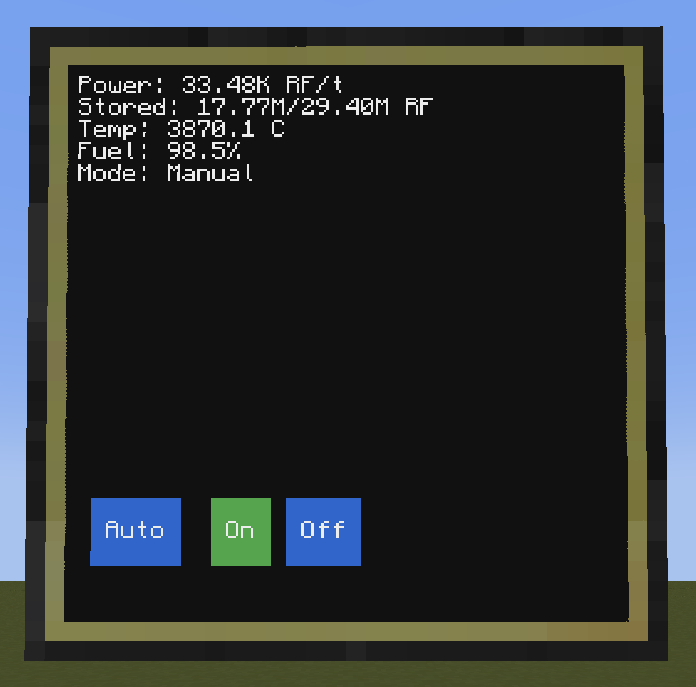
Now we will create the Controller. The Controller will receive the reactor information from the Manager and display it the attached monitors. On the monitors there will also be 3 buttons, Auto, On, and Off. These buttons will set the reactor to either auto-managed, on, or off when clicked. Then end result will look as follows:
Config, Peripherals, Monitor Size, and Button Definitions
To start, we will create some configuration variables.
| Variable | Description |
|---|---|
LISTEN_CHANNEL |
Defines what channel on the modem to listen on for messages |
RELAY_CHANNEL |
Defines what channel on the modem to send messages out on |
TEXT_SCALE |
The size of the text to use when writing to the monitor |
0-- Config
1local LISTEN_CHANNEL = 2
2local RELAY_CHANNEL = 1
3local TEXT_SCALE = 0.75
Then connect to our peripherals. This script assumes the monitor is connected to the back, and the modem to the top of the computer.
0-- Connecting to peripherals
1local monitor = peripheral.wrap("back") or error("No monitor found")
2local modem = peripheral.wrap("top") or error("No modem found")
Next we will get the width and height in pixels of the monitor set up we’re connected to. These values will change if the monitor built is larger than the 2x2 shown in this tutorial. Therefore, we can’t hard come them in. Instead we get them from the peripheral
| Variable | Description |
|---|---|
w |
The width of the monitor in pixels |
h |
The height of the monitor in pixels |
0-- Getting the monitor width and height
1local w, h = monitor.getSize()
Finally we will define our buttons. To do this we represent them as a table of tables. Each button has 5 parameters x, y, width, height, color.
| Variable | Description |
|---|---|
x |
The x-coordinate to start drawing the button at |
y |
The y-coordinate to start drawing the button at |
width |
The width of the button in pixels |
height |
The height of the button in pixels |
color |
The initial color of the button |
0-- Button definitions
1local buttons = {
2   {text = "Auto", x = 2, y = h-4, width = 6, height = 3, color = colors.blue},
3   {text = "On", x = 10, y = h-4, width = 4, height = 3, color = colors.blue},
4   {text = "Off", x = 15, y = h-4, width = 5, height = 3, color = colors.blue}
5}
Drawing the Buttons on the Monitor
Let’s create a helper function that when given a button, it draws it on the monitor based on its values.
To do this, first we set the color we’re using to the button’s color with setBackgroundColor(). Then we colour every pixel from coordinates (button.x, button.y) to (button.x + button.width, button.y + button.height - 1) to be that colour, which creates the reactangle shape. Then we reset the cursor to the middle of the button and write its text.
 0function drawButton(button)
 1   monitor.setBackgroundColor(button.color)
 2   -- Draw the button shape
 3   for y = button.y, button.y + button.height - 1 do
 4      monitor.setCursorPos(button.x, y)
 5      monitor.write(string.rep(" ", button.width))
 6   end
 7   -- Draw text in middle row
 8   monitor.setCursorPos(button.x + math.floor((button.width - #button.text) / 2), button.y + 1)
 9   monitor.write(button.text)
10   monitor.setBackgroundColor(colors.black)
11end
You might have noticed that we don’t actually itterate over the x values, only the y values. Instead of also itterating over x, we paint all the needed pixels on that row at the same time (y-value) by writting spaces.
Now that we have a way to draw a button to the monitor, let’s create another helper that calls this function for all the buttons. We also want the color of the buttons to reflect the mode that is currently selected. In this function we can implement this logic by passing it the reactor’s statistics (which we will manage obtaining later). This can be achieved by checking if the reactor is override mode, and if its currently on.
 0function drawButtons(stats)
 1    -- Set the active button to green, otherwise blue
 2    buttons[1].color = stats.dynamic and colors.green or colors.blue
 3    buttons[2].color = (not stats.dynamic and stats.active) and colors.green or colors.blue
 4    buttons[3].color = (not stats.dynamic and not stats.active) and colors.green or colors.blue
 5
 6    -- Draw each button to the monitor
 7    for _, button in pairs(buttons) do
 8       drawButton(button)
 9    end
10end
Drawing the Reactor’s Statistics to the Monitor
So we’ve handled drawing the buttons to the monitor - which is the trickier part. Now we want to draw out the statistics as well. We can simply display the amount of RF the reactor is currently generating, the amount of RF it has stored, it’s temperature, fuel, and mode. To do this, we will format the values passed from the Manager computer into strings and print them on incremental lines.
To start, we will create a helper function to format the RF values passed into K or M notation, as those values can get quite large.
0function formatRF(rf)
1   if rf >= 1000000 then
2       return string.format("%.2fM", rf/1000000)
3   else
4       return string.format("%.2fK", rf/1000)
5   end
6end
Now we will make the function drawStats() which will actually display them on the monitor.
 0function drawStats(stats)
 1   monitor.clear()
 2   monitor.setCursorPos(1,1)
 3   monitor.write(string.format("Power: %s RF/t", formatRF(stats.rf_output)))
 4   monitor.setCursorPos(1,2)
 5   monitor.write(string.format("Stored: %s/%s RF", formatRF(stats.rf_stored), formatRF(stats.rf_capacity)))
 6   monitor.setCursorPos(1,3)
 7   monitor.write(string.format("Temp: %.1f C", stats.temperature))
 8   monitor.setCursorPos(1,4)
 9   monitor.write(string.format("Fuel: %.1f%%", (stats.fuel_ammount/stats.fuel_capacity)*100))
10   monitor.setCursorPos(1,5)
11   monitor.write(string.format("Mode: %s", stats.dynamic and "Auto" or "Manual"))
12end
Putting the Drawing Functions Together
Although we’ve seperated drawing processes into two functions drawButtons() and drawStats() for organizational purposes, we’re always going to want to call these together. To help with this lets add another simple function to do so.
0function draw(stats)
1    drawStats(stats)
2    drawButtons(stats)
3end
Now anytime a new statistics report is received from the Manager we can easily update the monitor.
Receiving the Statistics Messages from the Manager
Very similarly to how we handled the inverse process in the Manager we will create a function to handle receiving message requests. This function will trigger everytime a message is received, verify that it’s coming from the correct channel, confirm the message is a table, finally passing the info to our draw() function if so. With this setup, each time we get an update from the Manager it will update our monitor.
For more information on message handling checkout the CC: Tweaked Modem Docs.
 0function handleMessage()
 1   modem.open(LISTEN_CHANNEL)
 2   while true do
 3       local _, _, channel, _, message = os.pullEvent("modem_message")
 4       if channel == LISTEN_CHANNEL
 5           and type(message) == "table"
 6       then
 7           draw(message)
 8       end
 9   end
10end
Handling the Buttons being Clicked
To check if a button has been clicked, we will bind listen for monitor_touch events. When once happens, we can determine if the location the user touched was inside of one of the buttons. To accomplish this, we check if the (x, y) location the user touched is inside any of the buttons. If so, we send a message to the Manager specifying the user’s mode selection.
 0function handleClick()
 1   while true do
 2       local _, _, x, y = os.pullEvent("monitor_touch")
 3       for i, button in ipairs(buttons) do
 4           if y >= button.y and y < button.y + button.height and
 5              x >= button.x and x < button.x + button.width then
 6               local message = {
 7                   override = button.text ~= "Auto",
 8                   state = button.text == "On"
 9               }
10               modem.transmit(RELAY_CHANNEL, LISTEN_CHANNEL, message)
11           end
12       end
13   end
14end
Putting it all together
We now have all the code we need for the Controller. We can put it all together into one file and add a quick initalizer. The initalizer will open setup the monitor, open the modem on our LISTEN_CHANNEL, and start all our functions with while loops in them in parallel using the CC: Tweaker Parallel Global.
Initalizer:
0function init()
1    monitor.clear()
2    monitor.setTextScale(TEXT_SCALE)
3    parallel.waitForAll(handleMessage, handleClick)
4end
All put together:
  0-- Config
  1local LISTEN_CHANNEL = 2
  2local RELAY_CHANNEL = 1
  3local TEXT_SCALE = 0.75
  4
  5-- Connecting to peripherals
  6local monitor = peripheral.wrap("back") or error("No monitor found")
  7local modem = peripheral.wrap("top") or error("No modem found")
  8
  9-- Getting the monitor width and height
 10local w, h = monitor.getSize()
 11
 12-- Button definitions
 13local buttons = {
 14   {text = "Auto", x = 2, y = h-4, width = 6, height = 3, color = colors.blue},
 15   {text = "On", x = 10, y = h-4, width = 4, height = 3, color = colors.blue},
 16   {text = "Off", x = 15, y = h-4, width = 5, height = 3, color = colors.blue}
 17}
 18
 19function drawButton(button)
 20   monitor.setBackgroundColor(button.color)
 21   -- Draw the button shape
 22   for y = button.y, button.y + button.height - 1 do
 23      monitor.setCursorPos(button.x, y)
 24      monitor.write(string.rep(" ", button.width))
 25   end
 26   -- Draw text in middle row
 27   monitor.setCursorPos(button.x + math.floor((button.width - #button.text) / 2), button.y + 1)
 28   monitor.write(button.text)
 29   monitor.setBackgroundColor(colors.black)
 30end
 31
 32function drawButtons(stats)
 33    -- Set the active button to green, otherwise blue
 34    buttons[1].color = stats.dynamic and colors.green or colors.blue
 35    buttons[2].color = (not stats.dynamic and stats.active) and colors.green or colors.blue
 36    buttons[3].color = (not stats.dynamic and not stats.active) and colors.green or colors.blue
 37
 38    -- Draw each button to the monitor
 39    for _, button in pairs(buttons) do
 40       drawButton(button)
 41    end
 42end
 43
 44function formatRF(rf)
 45   if rf >= 1000000 then
 46       return string.format("%.2fM", rf/1000000)
 47   else
 48       return string.format("%.2fK", rf/1000)
 49   end
 50end
 51
 52function drawStats(stats)
 53   monitor.clear()
 54   monitor.setCursorPos(1,1)
 55   monitor.write(string.format("Power: %s RF/t", formatRF(stats.rf_output)))
 56   monitor.setCursorPos(1,2)
 57   monitor.write(string.format("Stored: %s/%s RF", formatRF(stats.rf_stored), formatRF(stats.rf_capacity)))
 58   monitor.setCursorPos(1,3)
 59   monitor.write(string.format("Temp: %.1f C", stats.temperature))
 60   monitor.setCursorPos(1,4)
 61   monitor.write(string.format("Fuel: %.1f%%", (stats.fuel_ammount/stats.fuel_capacity)*100))
 62   monitor.setCursorPos(1,5)
 63   monitor.write(string.format("Mode: %s", stats.dynamic and "Auto" or "Manual"))
 64end
 65
 66function draw(stats)
 67    drawStats(stats)
 68    drawButtons(stats)
 69end
 70
 71function handleMessage()
 72   modem.open(LISTEN_CHANNEL)
 73   while true do
 74       local _, _, channel, _, message = os.pullEvent("modem_message")
 75       if channel == LISTEN_CHANNEL
 76           and type(message) == "table"
 77       then
 78           draw(message)
 79       end
 80   end
 81end
 82
 83function handleClick()
 84   while true do
 85       local _, _, x, y = os.pullEvent("monitor_touch")
 86       for i, button in ipairs(buttons) do
 87           if y >= button.y and y < button.y + button.height and
 88              x >= button.x and x < button.x + button.width then
 89               local message = {
 90                   override = button.text ~= "Auto",
 91                   state = button.text == "On"
 92               }
 93               modem.transmit(RELAY_CHANNEL, LISTEN_CHANNEL, message)
 94           end
 95       end
 96   end
 97end
 98
 99function init()
100    monitor.clear()
101    monitor.setTextScale(TEXT_SCALE)
102    parallel.waitForAll(handleMessage, handleClick)
103end
104
105init()
Installing & Starting the Scripts
To actually install the scripts we’ve created to the computers you can either:
- Drag the file from your file explorer into the computers terminal
- Use the
pastebin get <code> <name>command, where<code>is the unique code at the end of the pastebin url, and<name>is the script name to save this under
On the Reactor Manager
- Right click the computer attached to the reactor to open its terminal
- Type the command
pastebin get vUVC0dH4 managerto save the script under the file namemanager - Type
managerand hit enter to start the script
On the Reactor Controller
- Right click the computer attached to the monitor to open its terminal
- Type the command
pastebin get Qj2QnyXt controllerto save the script under the file namecontroller - Type
controllerand hit enter to start the script
Finished!
And that’s everything! The scripts are now running and you should have a working control system. If you’ve made it this far, thanks for the read and I hope you were able to learn something along the way. Please feel free to leave a comment if you have a question, I’ll try my best to answer it.
Cheers.

